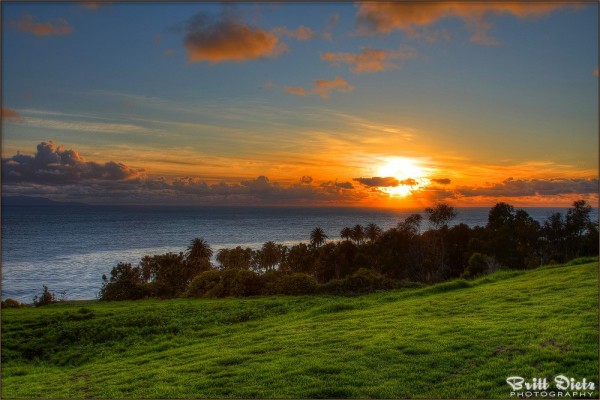
HDRI. You either love it or you hate it, if you know what it is. Probably one of the biggest debates in photography right now gets to the essence of what HDRI is, and if it truly is photography or just an art form. HDRI has it’s pros and cons, each one pretty significant. Done correctly, you can create some beautiful images with the HDRI process, but you can also create some hideous shots that go well beyond the realm of normal and into grunge art or even worse destroy the concept of the photograph.
[ad name=”GA1″]
Walking around the photo showcase at the recent Orange County Fair in Costa Mesa, California this past July I noticed that HDRI images are on the rise. They can be pretty easy to spot if you know what to look for if done correctly, and other times they jump out at you screaming that they are HDRI images. But it surprised me to see how many HDRI images were entered into the annual photo contest. There were some really spectacular ones, and then there were some pretty… well ‘overdone’ ones to put it mildly. And that’s the main problem with HDRI and what has sparked the big debate, what is too far for HDRI photos?
Before I get any further, I should probably explain to those who don’t know what HDRI is. HDRI is called High Dynamic Range Imaging and dates back to it’s simplest form to the 1800s. 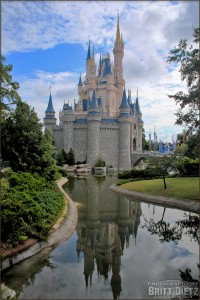 Basically, HDRI is the process of taking multiple shots of the same photo made at different exposures and combined together via computer software to create an otherwise impossible shot were everything is perfectly exposed for. Basically, making the shot look more like how you can see with your eye. The human eye’s level of exposure is incredible… it’s what allows us to be able to see the detail on the very bright moon while also seeing someone’s face in darkness next to it. That’s impossible for a camera currently, they amount of exposure variances in one particular shot is limited with technology for now, so you’d have to choose between either a long exposure to be able to see the person’s face but then the moon would be blown out and burn white. Alternatively, if you wanted to see the moon, you’d have to darken the shot meaning a faster shutter speed so you could see the detail on the moon, but then the person’s face would be completely dark. HDRI mimics the human eye when by combined several photos starting from too dark (under exposed) and going to too bright (over exposed) you have a range of exposures, which are then analyzed by a computer program and the levels of exposures for each bit of the image are adjusted and leveled out so that nothing is over exposed, and nothing is under exposed.
To achieve these multiple exposures, you have to use what most cameras (mainly SLR) have called Bracket Exposure. This will, basically, take a set number of photos each one a different exposure than the last. Very high end SLR cameras, such as the Canon EOS 1D Mark III, will allow you to take up to 7 bracketed exposures where the camera will basically figure out the different exposures necessary to go from too bright to too dark. From there, you’ll need to use a HDRI program out there, unless you want to do them manually in Adobe Photoshop which I’d not recommend as this would take many many many hours, something a simple software can do in a few minutes. Some of the latest Photoshop version contain a simple ‘Merge to HDRI’ program that’s built into Photoshop that can give you a basic render of the different exposures into one HDRI image.

Now, I’m going to take this further and get a bit more technical here on what an HDRI image really is, because the final version you often see (like the ones I’ve posted on this blog) are not truly HDRI images, but Tone Mapped images that are from a raw HDRI. A true HDRI image is huge, the amount of colors and exposure data in a raw HDRI image is incredible; and unless you have a very rare and specialized HDRI computer monitor, a standard everyday LCD screen or projection monitor cannot display the true range of an HDRI. So, to basically dumb down the image so monitors can see a representation of an HDRI image, you can process the HDRI image through various type of rendering styles that allow you to produce an image that’s viewable. Tone Mapping is far the most popular, and gives you the most control. Basically, this is what Tone Mapping is:
“Tone mapping is a technique used in image processing and computer graphics to map one set of colors to another, often to approximate the appearance of high dynamic range images in a medium that has a more limited dynamic range. Print-outs, CRT or LCD monitors, and projectors all have a limited dynamic range which is inadequate to reproduce the full range of light intensities present in natural scenes. Essentially, tone mapping addresses the problem of strong contrast reduction from the scene values (radiance) to the displayable range while preserving the image details and color appearance important to appreciate the original scene content.”
Have I lost you yet? Basically, your computer and monitors can only see a certain range of colors and exposures, not anywhere close to what an HDRI image is. So to convert this HDRI raw image into something you can see, the software has to take each color, brightness, darkness, etc and match it up to something that’s similar that your computer can actually see. Make sense now? Once you’ve Tone Mapped the HDRI raw image, you’re left with a rendered image that can be saved as a JPEG or other format and be used like any normal image, just with a massively dramatic range of colors and exposure. So what exactly would this process be good for?
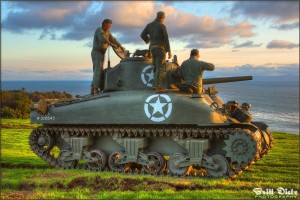
You’ll find HDRI works well in several situations. One of the most popular uses of HDRI is with landscape and architecture shots. Getting the brilliance of color and the range of lighting effects in a building where light beams come through windows and the natural light bouncing around the inside would make a normal exposure impossible.  This is one of the best uses of HDRI, and is heavily used in this manner. Shooting spectacular sunsets on the beach with really dramatic clouds and breathtaking colors is another big reason to try out HDRI. For my own self, even beyond those two subject I find getting the perfect and otherwise impossible static shots of aircraft at airshows to be a great way to use HDRI. Sometimes you can get some really dramatic sunsets at airshows, and being able to get the aircraft exposed for and the sunset behind them can be near impossible without using a fill-in flash. So HDRI comes in handy in this way, along with bright sunny days where the aircraft can get too bright in the sun and too dark in the shadows. An HDRI image will help even out this range of light on the aircraft and make a much better looking static shot. Another location I’ve done many HDRI photos is at the Disney parks, where there’s a lot of color and dramatic lighting. Both Disneyland Resort in California and Walt Disney World in Florida I’ve tried out HDRI images on various subjects in the park to really get that epic dramatic shot. Sometimes you must pick and choose the right moments to use HDRI, otherwise the effect is lost when the scene doesn’t really need HDRI.
HDRI BEFORE/AFTER

In the example above you can see a normally exposed photo of a US Marine CH-53E Super Stallion helicopter at an Airshow in October of 2009. The sun was very bright that day, and with the lighter grey paint job of the Us Marine aircraft, the sun is very harsh on the lighting. Not only that, the shadows from the bright sun made for some really harsh shadows on the aircraft. As you can see, I attempted to expose for the more shadow side of the aircraft, and as such the sun side is really blown out. It’s a catch 22 for this image because no matter how you shoot it something will be too dark or too blown out.
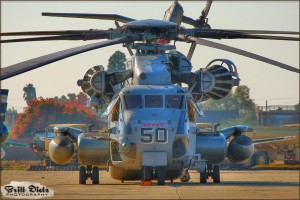
Now, here’s the same shot done as an HDRI above, with 5 different exposures put together. As you can see, everything from the sky to the inside of the aircraft are exposed for, and nothing is blown out or too dark. Now if you go back and look at the original shot, you might think it’s bland and plain in comparison to the HDRI. This image was Tone Mapped in a program called Photomatrix, which is by far the BEST HDRI processing program out there.
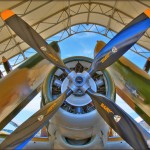
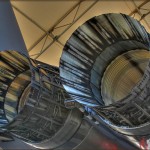
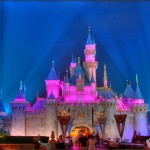
Other examples of a great situations to use HDRI are the three images above. In the first image, a AD-4N Skyraider sits in a hangar at NAF El Centro. The shot would be near impossible to capture the detail on the Skyraider, but also not blown out the sky and overhang above it. With HDRI, it brought out the overhang, sky, AND Skyraider with great exposure and color. The second image of the engines of a F-15E Strike Eagle would have not looked nearly as dramatic with all the little details perfectly exposed for had it not been for taking an HDRI image. Without that range of exposure, the engines would have lost a lot of detail in the darkness, or the background would have been blown out with a long exposure. The third image, of Sleeping Beauty’s Castle at Disneyland, California would have been impossible to get the exposure of the bright lights on the castle and also the beams of light that were hitting the left over smoke from the low level fireworks that had just finished without the multiple bracketing shots of HDRI. It would have been either too dark to see the beams of light in the smoke or too bright blowing out the castle to get this with one shot. Now you can see the benefit of having an HDRI image instead of just a regular photography. So now you might be asking, well why not use HDRI all the time then?
The CONS of using HDRI range from simple carelessness and the ability to go too far with the processing. Now, this is all objective of course, some people like the really overly done HDRI grunge style (as it’s called). There’s two sides to this great debate, and the question of how far is too far and if HDRI can still be considered photography will probably rage on for years to come. When I say cons to HDRI, this is my own personal objection to HDRI and should be taken as a personal opinion and not unanimous collective thinking by everyone. I have found, however, that many people do agree with the same thoughts that I have with the downsides to HDRI, so I’ll go through some of what I think make an HDRI image go from great to bad… with examples of HDRI images I myself have done wrong or too much.
CON #1 – Too much processing
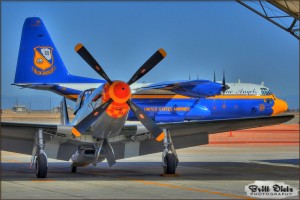
There’s a point with HDRI images where you should stop if you’re still trying to make it look anything like a photograph and not an artistic painted piece. Your mind, when looking at a normal HDRI, already picks up that something is not right with the photo because it doesn’t follow the normal rules of limited exposure range, so when you take the HDRI processing too far and really go beyond the realm of anything your eye would even see, then your mind really picks up on this and immediately takes you out of whatever the photo might be. The photo above is a light example of going too far. You can see the Blue Angel’s C-130 Hercules known as ‘Fat Albert‘ is way too blue, and looks too saturated. Similarly, the P-51D Mustang looks overly done, and the colors are way too saturated. This is one simple example, and I’ve been images that are so incredibly processed they do not look real anymore. The tones of the exposure are all over the place, with shadows being almost brighter than the midtones! This is a big big problem with HDRI, unless you want that grunge effect. But in my personal opinion, this is taking HDRI to a point it’s no longer a photograph, especially when I spend more time trying to get over the fact that it’s obviously a heavily processed HDRI image than being able to appreciate what the image itself is.
Con #2 – HDRI not needed
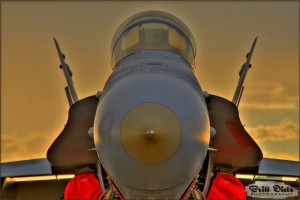
Since there’s a flip to every side, here’s another con where I’ve seen images where HDRI wasn’t really needed, it was just done for the heck of it. Most of the time, this will hurt the effect of HDRI and ruins the image. Take for example the shot of the F/A-18C Hornet above, in reality, there wasn’t enough range between the Hornet and the sky, so the image becomes very under contrast and bland looking. This again takes you out of the shot and makes you think something is wrong with the image. Not every image needs to be an HDRI, it should only be used when the situation is otherwise impossible for a camera or if you’re going for the artistic look to bring out details.
Con #3 – The magical ‘halo’
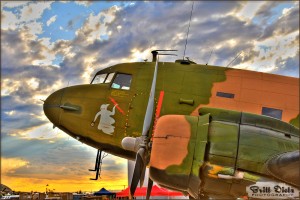
I think above all else, THIS is the one Con that annoys me the most. You’ll see it on many many HDRI images that haven’t been Tone Mapped in the best way. If you look at the image above, you’ll see exactly what I mean. Check out the AC-47 image above, especially under the nose. 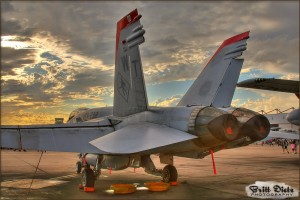 You’ll notice this almost outer glow around the curve of the nose that is very bright and seems to surround the aircraft. Notice how when there is a halo your eyes automatically snap to it! Another example is the image to the right on the tail of the F/A-18 Hornet. You’ll see this halo appear mostly because of incorrect settings in the Tone Mapping program with the tolerance of the shadows and highlights. Basically, the bottom of that AC-47 is very dark, and the sky is very bright. There has to be some way for the dark and lights to blend when they are Ton Mapped, so there’s a gradient that goes from light to dark. Problem is, when you have something very dark, like the bottom of the AC-47, into something as bright as the sky, it’s a major exposure jump. When the program tries to blend those two exposures, you end up getting a halo effect. There are many ways to counter that, mostly by setting how much of a tolerance there is to the exposure range which will remove this halo and make a much more natural image.
Con #4 – People
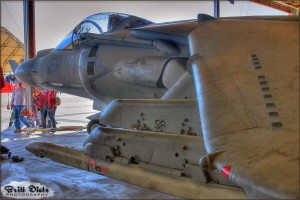
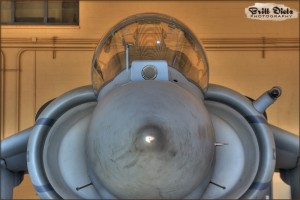
HDRI images don’t work on people or anything that moves. Why? Well, when you’re taking several photos at different exposures that will be blended together, any movement will cause the person or object to be in different locations for each shot. When those shots go to be blended together during Tone Mapping, the program may think a person’s jacket that is white in one shot is too bright, and then when the person moves in the other shots it’s a dark background… so it’ll try and blend the shirt with the dark background to make a ‘middle ground’ exposure. Now, if you take 4 shots and the person has walked to different spots in all 4 shots, you’ll end up with what’s known as ghost artifacts, or transparent objects. They are there, but you can see through them. Normally this would be a fun artistic choice, but with most HDRI images it’s just the sign that it truly is a HDRI image, no matter how good everything else looks. In the image above, if you look to the left of the AV-8B Harrier you’ll notice the two people walking by have ghost trails behind them. This is because of their movement over the three images that were taken to make this HDRI image. The best bet is to wait until people have passed before you take the bracketed images, but if you can’t help it there are ways around shooting the people moving. One of them being what’s known as ‘fake-HDRI’, which I’m not really going to get into on this post. But it basically involves the process of shooting a single RAW format image (which most cameras can shoot) and using the post-processing capabilities that only RAW files can do after being shot to make a sort of pseudo-HDRI effect. Sometimes this can work really well, and some HDRI image photographers use this method only, but it can’t give you the incredible range that normal HDRI bracketed shots can do.
All these cons are not to say you can’t overdo things and still get a pretty good shot. 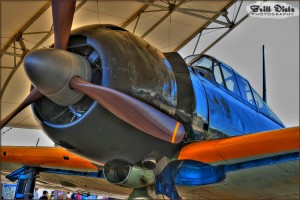 Here to the right, is a shot of a A6M3 Zero fighter. While it’s been a bit over processed and there’s a slight halo around the aircraft, it has a sort of artistic look to it that makes the image possibly a bit more appealing than just a regular HDRI. The colors are vivid, and the otherwise impossible to see reflecting detail in the dark black painted areas of the Zero stand out because of the HDRI being a bit too processed during Tone Mapping. The HDRI really picked up the blue reflection of the sky on the surface of the Zero making it almost look like it’s all painted black. The result was an accident when I was doing this, but I liked how it looked so I kept it this way instead of fixing it to a more natural look. The downside, however, is that this is obviously a HDRI image to most anyone who views it.
So that’s some of the best and the worst bits about HDRI photography. 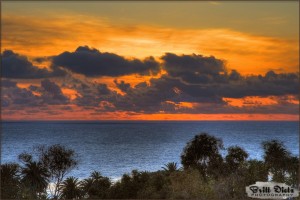 If you’d like to try it out, there’s many tutorials online and hundreds of books that talk about how to figure out what exposure bracketing you need to do for each situation. Sometimes you may need all 7 images at a certain type of exposure differences to get what you’re looking for, other times maybe only three shots are necessary at huge gaps of exposure. It all depends on what you’re shooting and what you want to do with the colors and light. Take time to play around with the Tone Mapped HDRI image in whatever post-processing program you used either if it’s Photoshop, Photomatrix, or whatever HDRI program you decide to use to get the best Tone Mapped HDRI image possible.
Below are some of the different types of HDRI Tone Mapped images I’ve done in the past few years. I still take HDRI images at Airshows and events when I need that impossible shot, but I tend to use it only when I really need it. Best of luck with your HDRI Photography!
[ad name=”GA1″]

