The Petty Project started out as an idea to recreate all of the late George Petty’s famous airbrushed Petty Girls from the1940s and 1950s through photography and photoshop.  Using real models in a photography studio, the famous artwork Petty created launching the golden age of Pinups would be recreated in painstaking detail as close as possible to the original.  While most of the times the Petty Girls are in impossible real world poses and their proportions not entirely correct for a normal human being, the use of photoshop would bring these photos closer to how the Petty Girl looks while still keeping the real world natural shape if at all possible.  Finally, using various photoshop tools, the finish photo would be converted to look like the classic Petty airbrushed style to hopefully closely mimic the original Petty Girl piece. The purpose of this project is to give homage to one of the greatest classic Pinup Artists of all time who’ve been lost to current generations who are bombarded with the works of Vargas and Olivia which closely follow the style of Playboy.  For more information on George Petty and the idea behind the Petty Project, click here for the Petty Project History post.
PETTY ARTWORK #010:Â OCTOBER WITCH

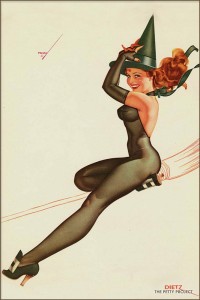
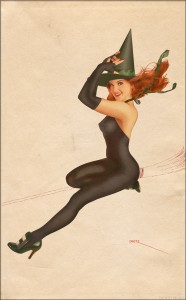
 Something a little festive for the start of the Petty Project posts on here, along with the month of October. Originally this was a piece of artwork that was done by Petty for Esquire magazine’s annual calendar which would feature his work made specifically for the calendar.  Generally the images were themed to the months, going from classic stereotypical genres to really obscure that can take a few minutes to figure out how it relates.  Petty’s original work (seen to the left) is one of his most classic and loved pieces.  It’s your classic Petty Girl, having some fun dressing up for Halloween.  With the wind blown hair and the very conforming full body tights, this Petty Girl manages to make a witch look sexy and like your classic girl next door of the 40s and 50s.  Most people who’ve seen classic pinups before probably have seen this piece, it often appears in anything that has to do with Petty.  It was reprinted several times following it’s premiere in Esquire’s calendar and appeared in other companies calendars once Petty left Esquire with the rights to his Petty Girls he’d done for Esquire.  One of the nice things about being able to keep his rights, the images appears in several other calendars from different companies over the years, an easy source of revenue for Petty.
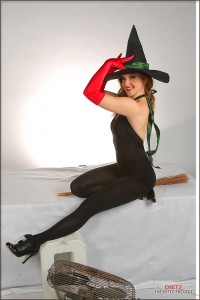
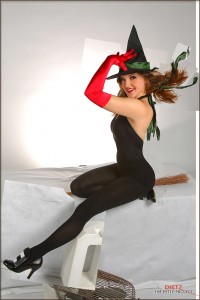
The concept for this Petty work is pretty simple overall, with blackish green full body tights, a witch hat, green heeled shoes with a large buckle, green ribbon, and gloves.  A bit of wind blown hair and a classic smile finishes the ensemble, with a drawn in broom for her to ride on.  My very beautiful friend and model Kayla volunteered to do this shot, picking it out of the many many different Petty poses I have to recreate.  One of her favorites, and certainly one of Petty’s most classic pinups, she was really excited to recreate this one, as I was I.  After pre-planning the outfit and trying to figure out what was available (it was after the New Year, so all Halloween stores were gone, finding pieces for this would be tough). The nice thing about shooting this project basically for Photoshop post work is that a lot of things could be fudged to fix later in ‘post’.  Still, though, I wanted to get it as close as possible so there was less time I had to spend changing things.  The original shot we did in the studio proved, as many of these Petty poses have shown, to be more difficult to capture than planned.  Basically, gals just don’t bend that way.  Even Petty himself stated that the Petty gal could not exist, she was too impossibly shaped and bent.  Using a black leotard top and black form fitting tights, Kayla put together most of the outfit itself.  Finding shoes that were pretty close (but a different color) she made her own buckle for the shoes which helped out tremendously.  I was able to find a witch hat that was laying around and use that, along with some green ribbon for her hair.  The long gloves, however, were another story.  finding gloves that long post-halloween was a bit difficult, especially when you’re not trying to spend a fortune on them.  The original idea was to just buy long gloves and cut holes for the fingers, but that seemed like a waste for the gloves, so we decided to just do that all in post.  I was able to find the correct length of gloves, however they were bright red.  Thankfully, changing the color of something in photoshop (especially a darker color like red) is pretty easy.  Putting it all together along with a broom I had bought the previous Halloween, the final studio shot is far from the final product, but the closest we could get with what we had.
[ad name=”GA1″]
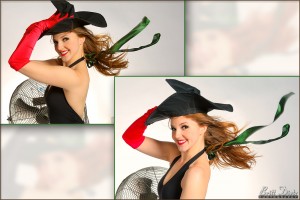
 We discovered that it was near impossible to get the wind machines to blow her hair in the way I wanted while she was in the full pose.  Problem was that the way Kayla has to hold the witch hat wasn’t enough for it to stay on with the wind machines cranked up to max power.  So we decided to shoot her without the wind machines to get the overall pose and body shots done, then just do some wind machine shots of her hair that I’d digitally add in later.  We had to take a few different shots and move the wind machines around quite a bit in order to get the correct flow of the hair to match Petty’s witch.  All in all, it would eventually take three shots combined of her hair to get the look I was going for mostly because her hair was unpredictable with the wind machines. Below you can see two of the original shots of her hair that were used in combination along with another shot to get the final hair look.  The same thing applied to her gloves.  Since we didn’t want to ruin them by cutting the fingers out, we decided to take two shots… one of her with gloves, then she’d hold the pose and I’d run over and take the gloves off.  To the right is one of the original shots of Kayla without the gloves, which would be digitally combined with the red gloves (but more on that in a bit).

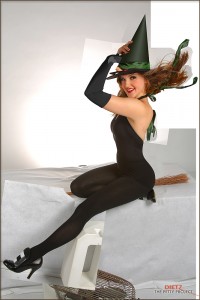
 After taking a few more shots and close ups from different angles just to be sure, I had all the photos I needed for that outfit. Â It was then time for the very long and hard work in photoshop to turn this photo into a piece of digital art that looks like Petty’s master artwork. Â Now, I’m not going to go through a step by step process on how I did everything. Â That’d take way too long and frankly mostly of it I forget! Taking the image into Adobe Photoshop, the first step was the correct a lot of the angles. Â Making Kayla bend her leg in an impossible way to get an angle of her leg to upper body that matched more of Petty’s witch. Â Then to arch Kayla’s back a bit more which would certainly have not been very good for it had she attempted to arch in that way in that pose. Â Kayla’s hair with the three photos seamlessly were combined to get the correct (or close as possible) wind effect. Photo to the right shows the raw photoshop in-process progress with the other images that have been combined with the original one clearly visible. Â Eventually, all of these bad transitions of the photo edges will be cleaned up with Kayla is extracted from the background.
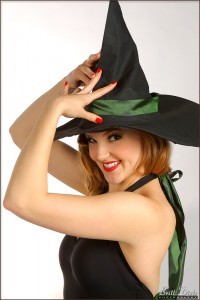
 I ended up not being thrilled with the witch hat we used. Â It wasn’t at the right angle, and wasn’t large enough. Â I realized that in order to really get that angle of Kayla’s arms, hands, and head I’d been a bigger hat, so I decided to just do one myself in photoshop using the photographed hat as reference. Â In the next step process photo shown here, you can see that there’s been a lot of editing of Kayla’s hands, and the red gloves have been turned to black. I’ve started to add back in her back hand (which then will have the now black gloves laid back on top of her hands with the fingers removed so that it appears like she has black fingerless gloves). Â I’ve removed her left hand, which is in front, to add more of the hat so that the transition between the black glove and her fingers doesn’t have any weird holes. Â The green ribbons, which in the shots without the wind machine just dangled behind her back, are in two places still behind her back and correctly flying in her hair. Those will be removed as well when she’s cut from the background. Â For now I’ve decided that since I will have to redraw in the witch broom anyway, I’m not going to worry about it and re-add it in later.
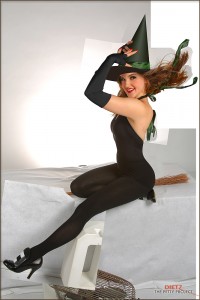
 Now things are starting to look more like Petty’s artwork.  The black fingerless gloves have been completely brought in and the hat has been finished.  Note, the hat does look pretty fake here and it’s clear it’s been photoshopped, but the process in which takes the final photograph and turns it into an airbrushed painting like Petty’s will blend that to the point it looks real.  There’s a couple things that still needed to be added to Kayla, just as her back arm which is missing from the shot.  The photo looks like a complete mess, but that will change once the next step is finished where Kayla is extracted.  This stage is where all the little touchups and fixes happen to finish the completed photograph.  A lot of work has already gone into getting it to this stage which can result in several days of work.  The blending of the photograph is the longest part of the whole process, and while a lot of fun, the part I dread most since it’s a lot of tedious work.  That’s why we attempt to get the original studio shot as close as possible to the Petty artwork, something that might take a few minutes in the studio to fix could save me hours of time in Photoshop.
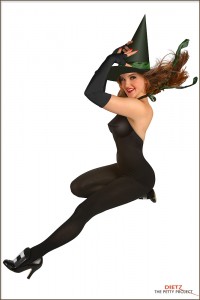
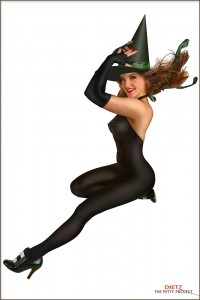
 After several hours of work, the image has been carefully cut away from the background.  Now it’s really starting to look more like Petty’s work, but it’s still a photograph.  The broom, for now, has been removed completely as I need to focus on just Kayla.  Other adjustments were made to finish off the image while it’s still a photograph.  Now that Kayla is cleaned and cut away from the background, the final bits of editing can happen in prep for turning the image into an airbrushed looking art piece. The toughest part about this is the hair, removing it front the background, especially since it’s all over the place, is a very difficult task! But after a few hours of work extracting Kayla and cleaning up the extracted image to have nice crisp edges, it’s ready for shading.  The extraction was done with a mixture of a Photoshop plugin called Fluid Mask and the lasso tool for the more complex areas that require more attention.  Kayla’s back arm was also re added back into the shot right before she was extracted. It’s just a standard white background for now, but the background can be changed to any color, and will be changed to a more old fashioned paper color one the airbrush process starts.
 Airbrush shading, I’ve come to find, is near impossible to replicate easily in a studio setting. Â It’s a piece of art, of course, so the light naturally is altered to match what the artist needs in the piece. Therefore, the lighting that falls on the subject is many times unrealistic in a real life situation, even if you don’t see it with your eye looking at the piece. Â For this shot, there was a lot of what I call ‘edge darkening’ where the light falls off on the edges of the Petty gal’s body. Â It’s almost like a slightly straight on and to the high right single light, but on other parts of her body it looks like it’s from a different direction. Â Not to mention I needed to get an almost shine effect on the now full body leotard. Â This almost automatically gives the image an painted look. Â But I’m going for airbrushed, not painted! Â The effect was achieved with the use of dodging and burning in Photoshop, a type of under and overexposing that dates back to the original days of film photography in a darkroom. Â Doing this to Kayla gives her leotard a nice sheen look and helps to accent her curves, something that also worked for the Petty Girls.
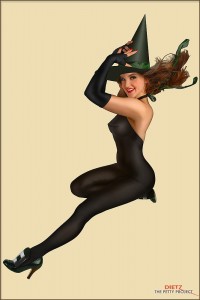
 And now what I call the ‘Petty Process’ begins.  This is a multistage process in photoshop which I’ve created an action for that turns the model from Kayla to an airbrushed Petty Girl.  It’s not completely automated, there’s still several steps in which the action stops and I have to do manual work.  This is one of those steps, where I have to give the image a ‘paint smeared’ sort of look.  Using various tools in photoshop, I smooth out the skin tones, and give a brush stroke texture look to the whole image, preserving the details of Kayla.  This is especially effective for the hair on these photos, as if I were not to go and make them look painted here they’d appear too realistic and way too ultra detailed to be an airbrushed artwork.  This step can take a good half hour since the image is at full 10 megapixel size in photoshop.  In effect, I’m digitally re-painting the image in a way here going over the entire image.  This is mostly important for the skin tones as the Petty Girls had no imperfections int heir skin, and if not removed from the photograph the Petty Process can actually make those imperfections worse if not removed.  But the plus side to this is that you get that painted texture to the skin tones, which end up separating the photo from a real photograph to an art piece. Already it looks like some of the more modern style pinups that are painted digitally.
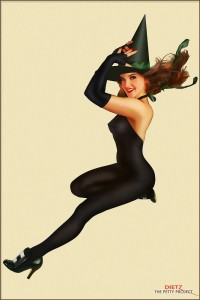
 After that’s completed, the specially built ‘Petty Process’ action continues making various blending layers from the original photo and the painted version I just completed. There is about 21 layers when all is finished as the different blend modes bring out that airbrushed style of colors and faded look of the gal.  Already it’s starting to give a more artwork look than a photograph here. It’s still too dark and contrasty, however, to mimic one of Petty’s shots. So more blending layers and texture layers will be added to give it that final airbrushed look. The outline has already started to form that gives the image even more of an artistic look, and the painted effect I had just done starts to bring out the color tones in Kayla’s skin.  This is fine tuned along the way, occasionally I have to adjust something that is unique to each shot since Petty’s artwork isn’t completely consistent as far as colors and tones go. When I get to this step, things are almost done and I can start to see what the final product will look like.  It’s also a time where, as photoshop is working, I can sit back and relax for a second having worked on the photo for quite a few hours!
It has finally finished! Â The last step is to digitally draw the broom back in, which I enlarged and elongated to match the broom in Petty’s shot. Using some more various blending layers and a few special filters in photoshop, I’m able to turn those red lines into a pencil drawn look for the broom. Â From here I’ve added a high resolution ‘old paper’ texture that’s as close to the type of texture you’d find on many of the Petty calendars from the 40s and 50s that have aged over the years. Â After a few color adjustments and any final tweaks, the final image is done. Â It’s time now to compare to the original to make sure I didn’t forget anything, which also usually also brings about a few more tweaks just to get it a tad closer, but overall the image is done. Â The final step is to add my Petty inspired logo to the bottom corner, and the Petty Gal ‘Witch’ with Kayla is now complete!


I hope you enjoyed the long look at how the Petty Process works. Â While not a complete ‘how to’, it gives some insight into the long process that it takes to mimic Petty’s master style through photography and photoshop. Â I hope to showcase other Petty Project recreations in the future!
All photos and Petty Process artwork are © Britt Dietz and may not be used without permission.  George Petty Witch image © respective owner(s).
[ad name=”GA1″]


